Setup
Installation
topaz is available on Linux, macOS and Windows platforms.
-
Binaries for Linux, Windows and Mac are available as tarballs in the release page.
-
Via Homebrew for macOS or LinuxBrew for Linux
brew install --cask aserto-dev/tap/topaz -
Via WinGet for Windows 10+
winget install Aserto.Topaz -
On Windows 10+
Download the
topaz_windows_x86_64.msifile from the GitHub releases page and execute the MSI. -
Via a GO install
go install github.com/aserto-dev/topaz/cmd/topaz@latest
Certificates
The Topaz console is a web UI that can be used to explore and interact with authorization policies and data. Topaz generates self-signed SSL certificates for development purposes but those aren't trusted by most operating systems and browsers, preventing the UI from loading successfully.
To trust the topaz development certificates run:
topaz certs trust
The commands adds two certificates to your system's trust store:
topaz-gateway-ca.crtis the certificate authority that signed the certificate used by the Topaz REST and web endpoints.topaz-grpc-ca.crtis the certificate authority that signed the certificate used by the Topaz gRPC services.
You can remove them from your trust store at any time by running:
topaz certs trust --remove
Quickstart
These instructions help you get Topaz up and running as the authorizer for a sample Todo app.
Install Topaz authorizer container image
The Topaz authorizer is packaged as a Docker container. Before using the container image installer ensure that you have a Docker runtime such as Docker Desktop installed.
You can get the latest image using the following command:
topaz install
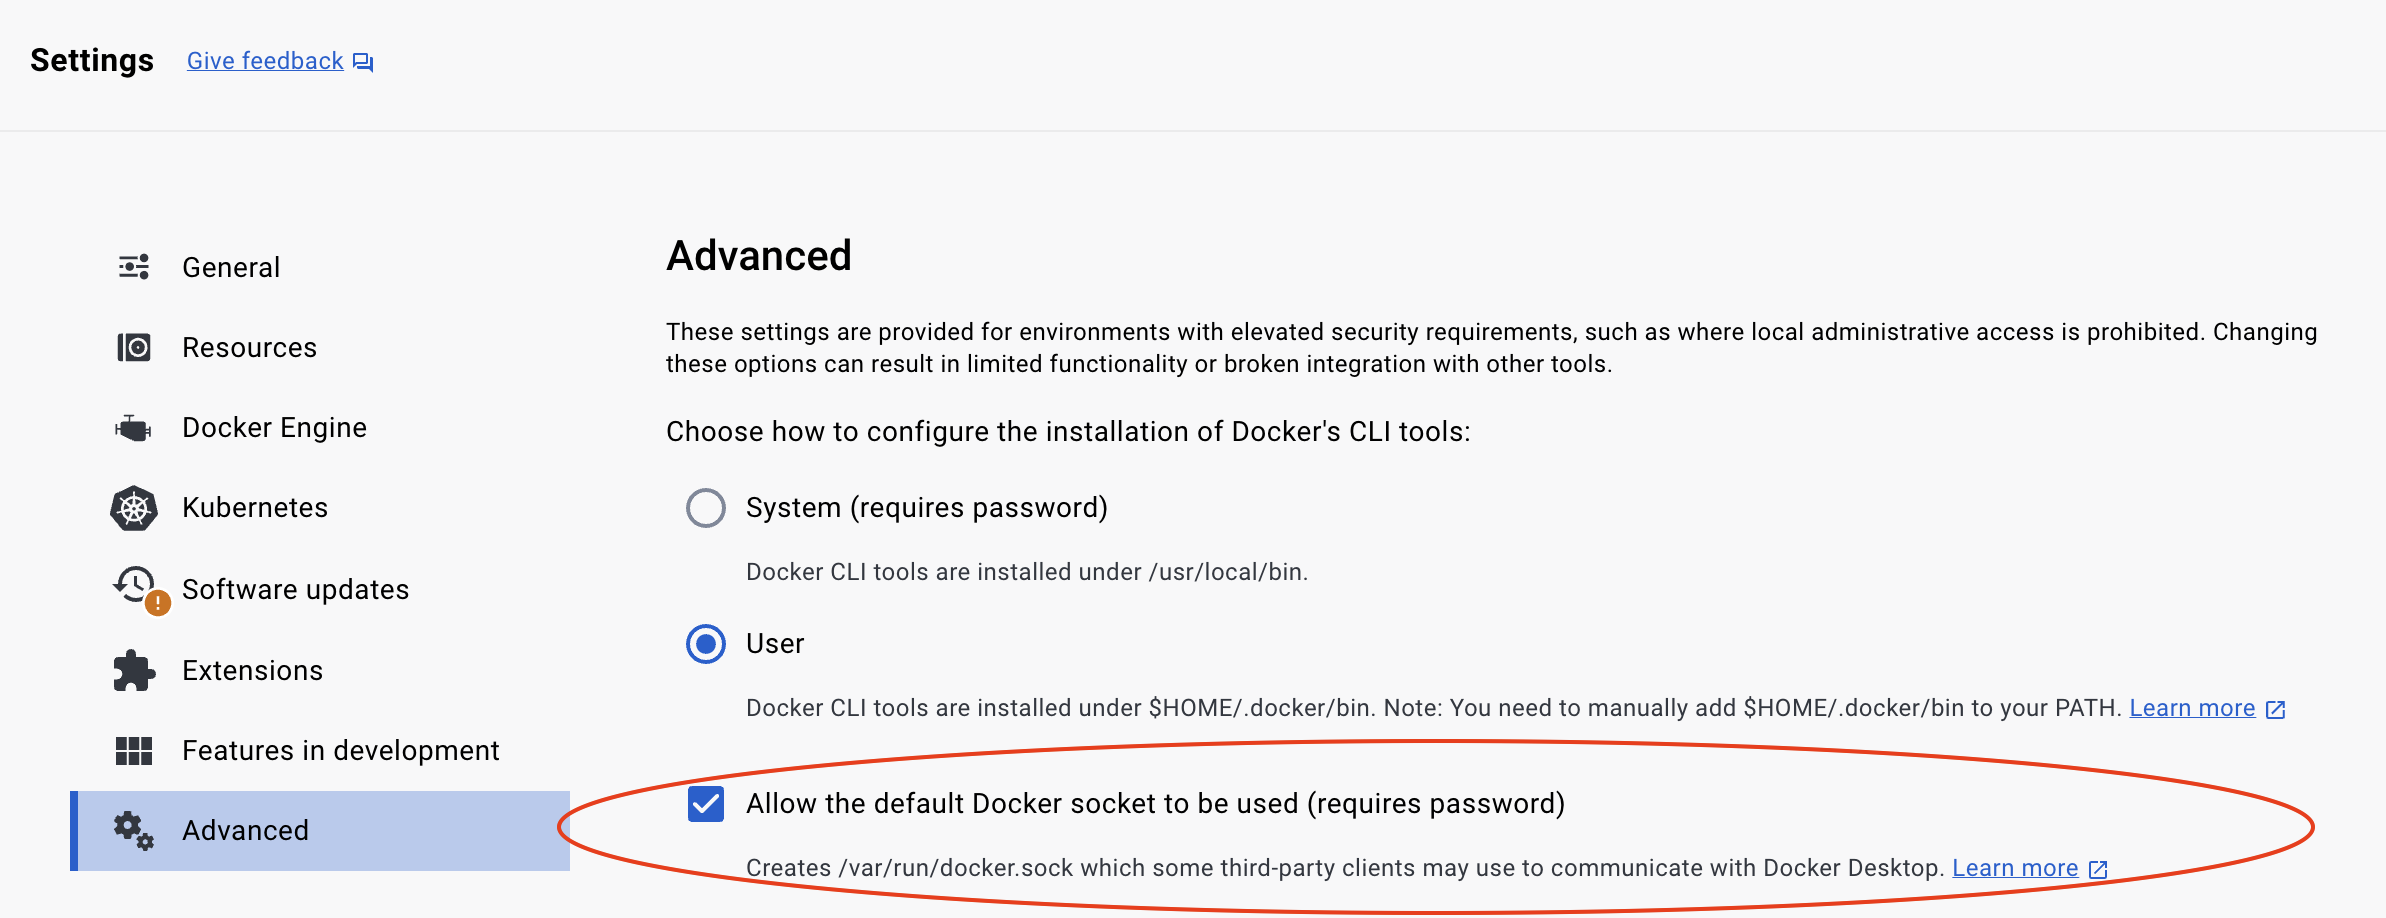
If you get the following errors/warnings from Topaz commands:
Cannot connect to the Docker daemon at unix:///var/run/docker.sock. Is the docker daemon running?
Be sure to allow the default Docker socket to be used in your Docker Desktop Advanced settings.
Install the todo template
Topaz has a set of pre-built templates that contain three types of artifacts:
- an authorization policy
- a domain model (in the form of a manifest file)
- sample data (users, groups, objects, relationships)
You can use the CLI to install the todo template:
topaz templates install todo
Artifacts
This command installs configuration artifacts in the Topaz configuration directory. To find out where this is, see configuration. Unless you've set $XDG_CONFIG_HOME, this should be $HOME/.config/topaz/.
tree $HOME/.config/topaz
/Users/ogazitt/.config/topaz
├── cfg
│   └── todo.yaml
└── topaz.json
cfg/todo.yamlcontains a Topaz configuration file which references the sample Todo policy image. A policy image is an OCI image that contains an OPA policy. For the Todo template, this is the public GHCR imageghcr.io/aserto-policies/policy-todo:latest. The source code for the policy image can be found here.topaz.jsoncontains all the installed configurations, as well as other Topaz defaults.
Data and template artifacts
The command also data and template artifacts in the Topaz data directory ($XDG_DATA_HOME/topaz), which defaults to $HOME/.local/share/topaz on Mac/Linux and $HOME\AppData\Local\topaz on Windows.
When Topaz starts, it will also create certificates in a certs directory under this path.
tree $HOME/.local/share/topaz
/Users/ogazitt/.local/share/topaz
├── certs
│   ├── gateway-ca.crt
│   ├── gateway.crt
│   ├── gateway.key
│   ├── grpc-ca.crt
│   ├── grpc.crt
│   └── grpc.key
├── db
│   └── todo.db
└── tmpl
    └── todo
        ├── data
        │   ├── citadel_objects.json
        │   ├── citadel_relations.json
        │   ├── todo_objects.json
        │   └── todo_relations.json
        └── model
            └── manifest.yaml
certs/contains a set of generated self-signed certificates for Topaz. that are based on the "Rick & Morty" cartoon.db/todo.dbcontains the embedded database which houses the model and data.tmpl/todo/data/contains the objects and relations that the template loads. Thecitadelfiles contain the users and groups associated with the "Citadel" demo IDP, and thetodofiles contain the template-specific objecs and relations.tmpl/todo/model/manifest.yamlcontains the directory manifest for the Todo template.
For a deeper overview of the cfg/config.yaml file, see topaz config.
What just happened?
Besides laying down the artifacts mentioned, installing the Todo template did the following things:
- started Topaz in daemon (background) mode (see
topaz start --help). - set the manifest found in
tmpl/todo/model/manifest.yaml(seetopaz directory set manifest --help). - imported the objects and relations found in
tmpl/todo/data/(seetopaz directory import --help). - opened a browser window to the Topaz console (see
topaz console --help).
Feel free to play around with the Topaz console! Or follow the next few steps to interact with the Topaz policy and authorization endpoints.
Issue an API call
To verify that Topaz is running with the right policy image, you can issue a curl call to interact with the REST API.
This API call retrieves the set of policies that Topaz has loaded:
curl -k https://localhost:8383/api/v2/policies
Issue an authorization request
Issue an authorization request using the is REST API to verify that the user Rick is allowed to GET the list of todos.
As a curl
curl -k -X POST 'https://localhost:8383/api/v2/authz/is' \
-H 'Content-Type: application/json' \
-d '{
     "identity_context": {
          "type": "IDENTITY_TYPE_SUB",
          "identity": "rick@the-citadel.com"
     },
     "policy_context": {
          "path": "todoApp.GET.todos",
          "decisions": ["allowed"]
     }
}'
Using the topaz CLI
topaz authorizer eval '{
     "identity_context": {
          "type": "IDENTITY_TYPE_SUB",
          "identity": "rick@the-citadel.com"
     },
     "policy_context": {
          "path": "todoApp.GET.todos",
          "decisions": ["allowed"]
     }
}' -i
gRPC Endpoints
To interact with the authorizer endpoint over gRPC, install grpcui or grpcurl and point them to localhost:8282:
grpcui --insecure localhost:8282
To interact with the directory endpoint, use localhost:9292:
grpcui --insecure localhost:9292
Next steps
- Clone and run the Todo sample backend in your favorite language.
- Create your own directory manifest.
- Create your own policy.
- Push your policy to a registry.
- Start Topaz by pointing it to your new policy with
topaz config newandtopaz start.